Wednesday, May 2, 2012

Unexpected Second Opinion


I had a regular appointment with my rheumo doc today. I sat there and, well, cried, and told him awful I felt and he looked at my swollen and purple feet and walked out of the room and made a phone call.

An hour and a half later, I was sitting in the office of another of Houston's top rheumo doc's (mine is on that list too) at the University of Texas Frank C. Arnett Center for Immunobiology and Autoimmunity (it's a mouthful). I wasn't supposed to get in until May 17th and then with one of the newer docs. The doc I was sitting across from is their top guy- like doesn't take new patients kind of guy. We went through my history and he asked a lot of questions and told me a lot about his research (he was one of the first guys to   map out Sjogren antibodies). An hour and a half later (seriously, what an awesome doctor to spend that much time with one patient!) he looks at me and says "well, it's more than Sjogren's". This didn't make me roll my eyes like you might think, I mean sure, part of me wanted to say "um, DUH", but the other part was very relieved that it was looking like he was thinking along the same lines as My Rheumo Doc. And he was. He started walking me through his thought process.

See, the tricky thing is, my official diagnosis is Sjogren's Syndrome with secondary Reynaud's disease. But the symptoms that are causing me the most problems aren't Sjogren's, they are lupus and other autoimmune disease symptoms. The medications I am on treat all of these diseases, but they aren't working for me. The other medication options available are only approved for lupus or R.A.

New Rheumo Doc says the following "you either have Sjogren's PLUS something else that hasn't presented enough for us to diagnosis or you have, what I really think is,  Undifferentiated Connective Tissue Disease (UCTD)/clinical lupus (this means I have the symptoms, but not the lupus antibodies) and secondary Sjogren's, if we had to put a name to it. Changing the name doesn't change how we tackle the problem, but it does change the options available to us." I was actually first diagnosed with UCTD when I first had problems (they called it Mixed Connective Tissue Disease back then, that term isn't used anymore to describe the things I have wrong with me), and then my Sjogren's antibodies became so prominent that they officially changed it to Sjogren's.

So, anyhow, enough with the complicated disease names. The forward plan is more blood work tomorrow and a lip biopsy in the next week or two. Apparently, the lip is the best resource for determining your body's inflammation levels. So if I look like I got collagen injections in my lip in the next week, I assure you, I didn't :). Whether or not the biopsy is positive doesn't really change things, but if it is positive, it just gives more rationale for why I need to be on the new meds.

After that, we'll talk medication options. New Rhemuo Doc  (referred to as "NRD" below - yes, I work at NASA and I like acronyms) and I had a very lively conversation about medications. Something like this:

Me: My Rheumo Doc and I talked about Rituximab.
NRD: Yes, that's a good option, I was also thinking about Belimumab.
Me: That's another name for Benlysta right? (Benlysta is the scary drug I don't want to take)
NRD: Yes
Me: Not happening.
NRD: You'd rather take Rituximab than Benlysta?
Me: Dude, have you seen the reports on Benlysta's side affects!? (yes, I actually called him dude)
NRD: I would rather be tied to a train rail and run over by a train before taking Rituximab over Benlysta (that may not have been his EXACT example, but there was tying and pain involved). Rituximab has a lot more side affects that Benlysta, especially during the infusion process.
Me: But Benlysta seems to work for only about 0.35% of patients who take it
NRD: Well, yes that's true.
Me: (I just stared at him)
NRD: Well, I was just talking the side affects, not how well it works.

Oh NRD, you are funny. But that was good info he gave me about the Rituximab - I wasn't aware and will have to consider that.

Anyhow, we'll cross the medication bridge when we come to it. The good news is I walked out of My Rhemuo Doc's office with a purse full of a new pain med to try since the Vicadin isn't helping (yeah, bad sign when narcotics don't cut it. I hate narcotics. I mean, I am thankful they exist to help people in pain, but I don't like putting them into my body). So here's hoping the pain management goes better during the next few weeks while New Rhemuo Doc and My Rheumo Doc chat.

As for the Mayo Clinic, I am tabling that after New Rheumo Doc confirmed the research I have been doing that Mayo doesn't have a strong Rheumatology area (they are AMAZING in other areas). It also turns out that the top Sjogren's research center in the US is in Oklahoma (yay for something closer than Minnesota). If needed, they can send me there for more opinions. Or to Johns Hopkins or Harvard, who both have very strong rheumatological research institutions. Good to know I have some impressive options available.

I am so incredibly thankful how God moved and allowed me to get in sooner to get a second opinion. I had prayed just this morning for My Rheumo Doc and I to have wisdom about what to do next and thanked God for the knowledge of medicine and that we would apply it appropriately. God doesn't always answer prayers immediately, but today He did, and He knew He was going to even before I knew what to pray this morning. That's how awesome my God is. Thank you Lord.

Tuesday, May 1, 2012

Ode to Chard


To be honest, before I tried this recipe, the only swiss chard I have eaten was in the Sweet Potato and Swiss Chard Enchiladas at Taco Milagro (they are delicious, in case you were wondering).


This is another Pinterest recipe and I really like the mix of flavors - the chard has a very "green" earthy taste, the sherry wine/apple cider vinegar combo I used brought out the sweetness of both the onions and the raisins. Top that off with walnut-nutiness and I will definitely be rotating this in as a good green dish.

Melissa's tweaks: couldn't find sherry vinegar (a quick google whilst in the grocery store revealed that it is hard to find and expensive - folks recommended a mix of cooking wine and apple cider vinegar) so I used 1T of sherry cooking wine and 1T of apple cider vinegar. And I only used one bunch of red swiss chard and it was good for just one serving (the recipe says it is 8 servings...they must of used REALLY big bunches of chard...or didn't eat the heaping plate full that I did ;-) ). Well, my plate wasn't really heaping, see in the picture? So whatever, just keep that in mind when planning for a group of people. Also, note in the "Method" section, you heat a large pot. Yes, just the pot. Not the pot with water in it. Just the pot. Thankfully, I caught this before I complete boiled the pot of water.

Swiss chard with walnuts (recipe from Whole Foods)


Ingredients

1/2 cup raisins 
2 tablespoons sherry vinegar 
2 bunches Swiss chard, preferably rainbow, stems removed, leaves sliced 
1 red onion, sliced 
1/4 teaspoon sea salt 
1/4 cup walnuts, toasted and chopped

Method

Put raisins and vinegar in a small bowl with 1/4 cup boiling water. Set aside to let soak 10 minutes. 

Heat a large pot over medium-high heat. Drain and reserve raisins; add liquid to the pot. Add chard a few handfuls at a time, stirring and letting the chard cook down until all of it fits in the pot. Add onion and salt, lower heat to medium, cover and cook until onion and chard are tender, 10 to 12 minutes. Stir in raisins and cook 1 minute longer. Top with walnuts and serve.

Spring Cleaning Status


I know you all have just been on pins and needles to see how my spring cleaning went ;-). Two and a half weeks ago, I posted a list of spring cleaning items I wanted to accomplish by the end of April. I didn't get everything done - some of the items will get done tomorrow (windows and baseboards) but considering how I have been feeling lately, I'm pretty happy with what I was able to accomplish! I know that in the grand scheme of things, being able to accomplish household tasks probably isn't all that amazing, but I am thankful that God allowed me to do them, because I want to be a good steward of what He has blessed me with.


Spring Cleaning chores for the month of April:

Inside:

Wipe down cupboards and doors
Wipe down all light switches and door knobs
Wipe baseboards
Wipe down all blinds
Dust ceiling fans
Clean out/wipe down refrigerator and freezer
Use stainless steel cleaner on outside of refrigerator
Clean inside/outside of microwave-
Clean dishwasher - thanks Claire!

Go through cupboards and toss old spices/tea/etc
Wipe down pantry shelves and sweep inside of pantry
Move DVD shelves and remove all spiderwebs

Wash all windows (inside and outside) – all the ones that are easily accessible
Wash front glass door
Pull out refrigerator and stove and clean behind them

Outside:

Clean up deck outside – throw away dead plants/pots
Trim outside bushes
Trim trees out front
Trim gardenia bush on the side of the house

Powerwash driveway
Powerwash deck

I also added cleaning and organizing my closet and my nightstand drawers (catch all for...everything) and I got both of those done as well!

The remaining items I hope to have complete in the next couple of weeks and then my Spring Cleaning will officially be complete!

Monday, April 16, 2012

Eat-the-entire-pan enchiladas

Another win for Pinterest:


Roasted Vegetable Enchiladas and I really wanted to eat the entire pan. Really. These are THAT good.

I think the secret is that you roast the veggies before baking the enchiladas. Great flavor with just cumin, salt, and pepper for seasoning

A food photographer I will never be - but you get the point between the plate and the pan - layers of veggie goodness.

Recipe:

Melissa's tweaks:
I only used 1T of grapeseed oil to toss the veggies in before roasting. The recipe calls for 3T, which honestly is overkill - 1T does the job just fine and cuts out 24o extra calories for the dish overall. Instead of baby spinach, I had some spring mix greens that were nearing their wilting date, so I just tossed those in. I only used 1 red bell pepper because I try to stay away from them (they are an "inflammatory vegetable"). I significantly reduced the amount of cheese (sorry, I didn't measure) and I nixed the sour cream. So all in all, this is a good healthy recipe with lots of different colored vegetables. The more color, the better! And, it happens to be gluten free too :)

from www.perrysplate.com

Stacked Roasted Vegetable Enchiladas

ingredients:

1 poblano chile, cut into matchsticks
2 red bell peppers, cut into matchsticks
1/2 head of cauliflower, cut into 1/2-inch chunks
1 small sweet potato, peeled and cut into 1/2-inch cubes (about 1 1/2 cups)
1 medium onion, halved and slivered
1 cup corn kernels, fresh or frozen
3 T heat-safe oil like grapeseed or coconut
1 1/2 tsp ground cumin
2 garlic cloves, minced
salt and black pepper
1/2 cup chopped fresh cilantro
2 cups homemade or store bought salsa/pico de gallo
2 ounces baby spinach leaves (about 2 big handfuls)
9-10 corn tortillas, halved (try making homemade tortillas!)
2 cups shredded cheese (I used a cheddar-Monterey Jack blend)
sour cream and thinly sliced scallions (green onions) for garnish, if desired

directions:

Preheat the oven to 425 degrees F. Lightly oil a large shallow roasting pan or rimmed cookie sheet.

Place poblanos, red bell peppers, cauliflower, sweet potato, onion, and corn kernels onto cookie sheet. Drizzle olive oil and sprinkle the cumin and minced garlic over top. Add a generous pinch or two of salt and black pepper, then use your hands to mix everything together. After everything is coated well, spread the vegetables evenly in the pan. Roast for 30-40 minutes until vegetables are tender and begin to brown in spots. Stir or shake the pan every 10 minutes for even roasting. Remove pan from oven and reduce oven temperature to 350 degrees F.

Prepare an 8x8x2 or 9x9x2-inch square baking pan with nonstick spray. In a small bowl, stir the cilantro into the salsa. Spread 1/4 cup of salsa into the bottom of the baking pan. Add a layer of tortilla pieces, to completely cover the salsa. Top with 1/3 of the vegetables, a handful of spinach, and 1/3 of the cheese. Make a second layer of tortilla, salsa, vegetables, spinach, and cheese. Top with with a layer of tortillas, salsa, vegetables, and cheese. Cover with aluminum foil.

Bake for 20 minutes. Remove the foil and bake another 10 minutes, until cheese is melted and everything is heated through.

Let it sit for 5 minutes and cut into squares. Serve with sour cream and a sprinkle of sliced scallions.

Serves 4-5


Saturday, April 14, 2012

Amazing Chocolate Muffins

<span class=
Photo courtesy of www.dashingdish.com


I have to blog this recipe, 'cause these muffins are awesome. It's a recipe I pinned from Pinterest. My friend Lisa made them first and I just tried my hand at them and they are incredibly tasty and healthy to boot.

I made mine gluten free by using gluten free oats (gf oat and oats are the same thing, it's just the gf oats aren't processed on equipment that also processes wheat, so using gf doesn't change the taste). I used Stevia (in lieu of Splenda) and accidentally reduced the amount (learn how to read Melissa!), I used Greek yogurt, and I also left out the chocolate chips.

I will say, they are even more amazing with the chocolate chips (like the kind Lisa made) but I was going for "little sugar as possible, something more appropriate for breakfast". I can't wait to experiment with this recipe and maybe add some nuts or flax seed. I had the roomie try them and while she thought they were good, they were too chocolately for her (she doesn't like chocolate cake things - I know, :gasp: right?). These are a very rich chocolate - perfect with a glass of skim milk to keep the whole healthy thing going :)

The website that has this recipe says that the muffins are about 58 calories apiece. I did my own calculations and got about 80 calories...eh, it's close.

Here you go! Enjoy!

Triple Chocolate Chunk Muffin

(recipe from www.dashingdish.com)

Ingredients:

  • 1 3/4 c oats
  • 3 egg whites
  • 3/4 cup unsweetened cocoa
  • 1/2 cup unsweetened applesauce
  • 1 tsp. vanilla extract
  • 1/2 cup plain Greek yogurt (or regular plain low fat yogurt)
  • 1/2 tsp cream of tartar (or 1-1/2 Tbsp. vinegar)
  • 1-1/2 tsp. baking powder
  • 1-1/2 tsp. baking soda
  • 1/4 tsp. salt
  • 1 cup hot water
  • 1 cup sugar substitute (like Splenda granular) OR 1/4 cup + 2 tbs stevia
  • 1/2 cup semi-sweet chocolate chips (or use white chocolate or peanut butter chips!)

Preheat oven to 350 degrees. Line 2 (12-cup) muffin pans with foil cupcake liners, or spray muffin tin with non-stick cooking spray. Set aside.
In a blender, (or food processor), mix all of the ingredients together, except for the chocolate chips. Blend until oats are ground and mixture is smooth.
Place mixture in a bowl and gently stir in 1/2 of the chocolate chips (set the rest aside). Scoop mixture into prepared muffin pans.
Place muffins tins in the oven for 10 minutes. After 10 minutes, remove muffins from the oven (but don’t shut oven off), and distribute the other half of the chocolate chips on top of each muffin.
Place the muffins back into the oven and bake for an additional 2-5 minutes, or until a toothpick comes out clean. *Note, you could skip this step by putting all of the chips in the batter, and baking the muffins for 12-15 min straight, but this method gives the muffins the traditional ‘VitaTop Muffin’ look with the chocolate chips on top!
Cool muffins before removing from pan. ENJOY!!!
Servings: 12 Big Muffins or 24 Smaller Muffins

Thursday, April 12, 2012

Spring Cleaning!


Okay, so maybe "Spring" is pushing it a little bit...after all, it is just about mid-April, which usually means summer for all the places I've ever lived, but considering the temperature is in the 80s and there's little humidity...well, I'm calling that Spring. And with Spring, comes Spring Cleaning! I've never done Spring cleaning. Ever. I've been seeing posts on Facebook about Spring cleaning and so I decided to make a list too. And my awesome roomie has offered to help out some too. Now, since I am pretty limited right now in what I can physically accomplish since my joints are hurting so much, my goal is to complete my list by the end of April, so that gives me about 2.5 weeks...I think that's pretty decent, especially considering I am probably going to just pay the neighbor kid to take care of a few things (like power-washing the driveway and deck).

I'm not going to blog all the tasks (because, really, who wants to see what's under/behind a refrigerator that hasn't been moved in two years? Ick). But I figured I'd at least post the Spring Cleaning Kick-off Tasks!


Spring cleaning list tacked up next to the standard chore list (yes, my roomie and I keep a calendar of chores- both of us are super busy, so this house could get really messy if we aren't organized!). I even broke the list into Inside and Outside chores-hey, at least I didn't use a spreadsheet...it was tempting though ;-) ).


1) Trim gardenia bush

Gardenia plants have always hated me. I bought no less than 3 plants while living at my apartment and all of them died. I tweaked water, sunlight, and food. Didn't help. They just died. So I was thrilled to discover when I first moved in that a MASSIVE gardenia bush (it's really tree-like, meaning, I hope it is here to stay!) grows just outside one of my kitchen windows. The branches literally bend to the ground under the weight of the amazingly fragrant blossoms. But...it was getting a bit out of control. So time to trim.

Thankfully, I purchased a branch trimmer a long time ago that was approved by the American Arthritis Foundation, which means that people with ouch joints can actually use this tool and not have to apply too much pressure to trim a branch. So I trimmed. It didn't need a lot, so it only took about 15 minutes (crazy how long one can put off a 15 minute task :) ). And then I cut some of the blooms to Springify my kitchen :)


See the branches piled outside? My wrists wouldn't handle the bagging of them today, but I can do that tomorrow. And just 3 of these gardenia blooms make the kitchen smell AMAZING!!!

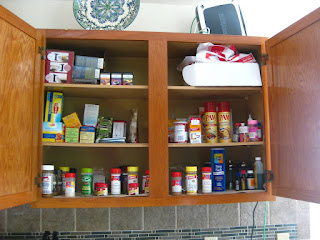
2) Clean out spice/tea/baking stuff cupboard

A hodgepodge of expired teas and spices, all cluttered together

Decluttered, shelves cleaned, and better organized. I could probably get some cute storage boxes to make it look even more organized...hmm...

Spring Cleaning is off to a successful start!

Friday, April 6, 2012

Two years later...

March 29th was my second house-a-versary, so I thought it would be fun to do "before" and "progress" pictures of the different rooms two years after closing. I am not finished with any of these rooms (hence, "Progress" rather than "After"), but I'm really happy with the results thus far. I'm enjoying making this house into a home.


Breakfast nook: Before and Progress


Master bedroom - before and progress


Kitchen - before (oh pink formica, I do NOT miss you) and progress


Living room - before and progress


More living room before and progress


Dining room before and progress


TV room (slightly wasted space) before and progress (I have NOT touched this room at all, it is literally my apartment living room transplanted into this house)

Hallway before and progress